Open post
Best Sabiki Rod

Best Sabiki Rod and Reel for Baitfish

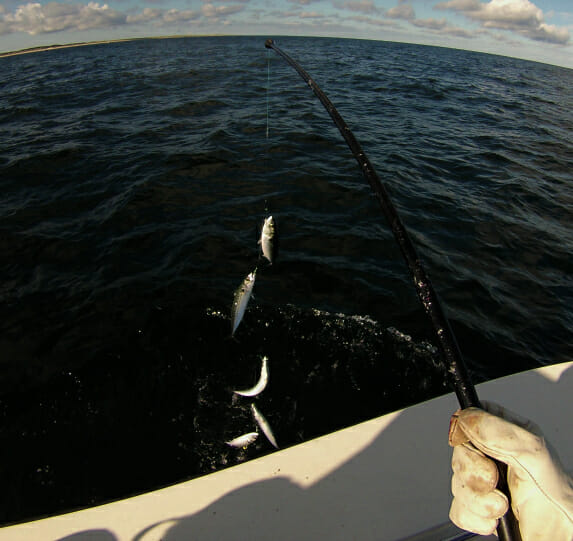
If you are catching a lot of live bait like mackerel and threadfin herring then the best way to haul a tonne of them onboard quickly is using a sabiki rig. A good sabiki rod or two will make life a lot easier.

The biggest complaints you’ll often here about using a sabiki rig is the tangled mess they can become on board when not in use.

That and the fact that you have 6-10 small hooks just waiting to get snagged in something can end up driving you crazy, fast!

​Enter the sabiki rod.

A sabiki rod is a purpose built rod blank that the line and rig run through the middle of the rod rather than through traditional eyes once pulled in. The aim here is to keep the rig and all it’s little hooks enclosed in the rod blank so that once on board they can’t cause any trouble.

​There are usually only two types of sabiki bait sticks available ones with a line guide before the line feeder and ones without.

The sabiki poles that have an added line guide before the line is threaded into the rod blank are suitable for use with both baitcaster/conventional type reels and spinning reels.

If the rod blank does not have a line guide then it usually best not to use a spinning reel with it.

On a boat I always favor the conventional reel than a spinning reel as you will be essentially vertically jigging the sabiki rig and casting is not an issue.

Best Sabiki Rods

1. AHI USA Sabiki Stick Bait Rod

​The Ahi USA rod is suitable for use with both spinning reels and baitcast/conventional reels. 

So if you are on a pier and are casting opt to pair it with a spinning reel. But, if on a boat and vertically jigging them the conventional reel is the best choice.

​You have the option or either a 7 or an 8 feet model and to be honest the choice should be determined by how long your sabiki rig is going to be. 

Choose the 7 foot model and an 8 foot length of jig then you’ll either have to contend with and extra hook hanging freely when all others are covered or just cut off the last one.

​If you are in a kayak the 7 footer may be easier to handle.

It breaks down into 3 small pieces so is easy enough to transport and this also make it easier to thread the line through it when you first set it up.

​Specifications:

  • ​8 foot in length
  • Suitable for both spinning and baitcast/conventional reels
  • Great build quality
  • Available in both 7 or 8 feet options
  • Canvas carry bag included

​Buy on Amazon


​2. EAT MY TACKLE Sabiki Rod

​This is a 7 foot option from EAT MY TACKLE which makes it more suitable to kayaks or smaller fishing boats.

​It is a two piece rod making transport and storage quite simple.

Unlike the AHI rod above it does not have a line guide before the opening for the line in the blank so it is suitable for baitcast/conventional reels only.

​Not really suitable for casting your sabiki rig any meaningful distance unless you have a fairly heavy weight on the end of the rig.

​Specifications:

  • ​2 piece, 7 foot rod
  • Baitcast or conventional reels only
  • Strong fiberglass construction
  • Lifetime warranty

​3. Promar Sabiki Stick

​The Promar Sabiki Stick come in either a 7 or 8 foot option.

They can handle any kind of reel so a spinning reel is an option here if you do not want to use a baitcaster.

​It breaks down easily into three sections and also comes with a storage bag. These rods are very well built and can take quite a bit of abuse.

​Specifications:

  • ​Three piece
  • 7 or 8 foot models
  • 1 line feeder guide
  • Comes with a storage bag

Sabiki Rod and Reel Combo

Purchasing a sabiki rod and reel combo as an all in one deal is a great way to get serious value for your money.

You can also rely on the rod and reel being perfectly suited to each other.

The Eat My Tackle Combo below is the best of the bunch.

​Eat My Tackle Sabiki Combo

​The Eat My Tackle sabiki combo is the perfect solution to your bait fishing needs.

Just spool on some mono, attach your rig to the main line and you are good to go.

This is the eight foot rod  from Eat My Tackle as seen above.

​The reel is a light-weight conventional reel that can hold up to 120 yards of 10 lb mono and is perfectly matched to the rod.

It is a right hand retrieve, has a star drag and a one way clutch.

​Specifications:

  • ​8 foot rod
  • ​Gear ratio 5.0:1
  • Holds 120 yd of 10 lb mono

​Sabiki Reels

​Although you can use spinning reels with sabiki fishing rods my preferred setup when jigging from a boat is to use a small conventional reel.

​The best time to use a spinning setup is when you are casting from a pier. Sabiki rigs can be quite light and casting them any kind of distance from a pier using a conventional reel can be a little difficult.

But on a boat hands the conventional reel the way to go.

You don’t need anything to fancy, a plain level wind with a line counter works great.

​Always make sure to rinse your reels in fresh water after use, it will improve their lifespan significantly.


1. Penn Rival Level Wind

​The Penn Rival level wind conventional reel is a no frills lightweight reel that won’t break the bank.
Although it might be priced on the lower end it still comes with Penn’s legendary build quality.

These are perfect a sabiki reels and will not break the bank.

​For such a small and light conventional reel the Rival is still built from some very high quality materials. Marine grade bronze alloy main gear and carbon fiber drag washers ensure a smooth operation.

The smaller model is best suited for bait fishing and can hold 475 yards oof 15 lb monofilament fishing line.

​Specifications:

  • ​HT-100 carbon fiber drag washers
  • 2 stainless steel ball bearings
  • Frame and sideplates from lightweight graphite
  • Line capacity rings

​2. Okuma Magda Pro Line Counter

​Okuma line counter reels some of the most reliable available. They are use on large freshwater lakes and for trollig at sea for smaller sized sport fish.

The Magda Pro in the smaller sizes make a great little sabiki reel.

With the added bonus of a line-counter builtin you can always be sure of just how deep exactly your rig is.

​Specifications:

  • ​Carbon drag system
  • Built in linecounter
  • 2 stainless steel ball bearings
  • Self lubricating gear system
  • 1 year warranty

​Sabiki Rod

​Sabiki Rods are pretty are a great way to keep your Sabiki rig from becoming a tangles mess. A common complaint with using a conventional rod for a sabiki rig is that once you reel them in and attempt to store them the rig becomes a massive tangles mess.

Not only do the get tangled up on all the rod eyes and main line but usually some of the hooks will end up getting snagged on some thing on the deck of the boat.

For me it was always one of either two landing nets. Hooks just love to get caught in nets and they are a real pain to untangle especially when you could be doing something more fun like actually using your new bait ti catch some real fish.

​A Sabiki rod is essentially a rod that is hollow in which the main line runs through as opposed to conventional rod guides and eyes.

​The design of a sabiki fishing rod is that it is actually wider at the top. The tip of the rod has a large opening. The opening has smoothed sides that allow your rig to enter the tube without snagging. Once the rig is fully enlosed in the rod tube there is no chance of any kind of tangle happening. 

You can usually pair a sabiki baitfish rod with a simple and in-expensive level wind or conventional reel.

Personally I use whatever old reels I have. If a reel has been retired from active duty on my main fishing setup them I’ll re-spool it with lighter line and then use it on my baitfish rods.

Most solid reels will last a long time when used as part of a sabiki rod and reel combo. Just remeber to rinse them out with fresh water after every trip whether you use them or not.

Open post
Flounder Gigging Equipment

Flounder Gigging Equipment List – (What You’ll Need)

The minimum basic flounder gigging equipment that you’ll need on your first gigging adventure is an actual gig.

But;

There are quite a few approaches to gigging and not all of the gear or equipment that you’ll need for one is necessary for the other.

Different ways of gigging:

  • Wading
  • Boat
  • Kayak
  • At night
  • Daytime

Below we’ll concentrate on working from a boat and the bare minimum amount of equipment for flounder gigging that you’ll need to get started.

Flounder Gigging Equipment

  1. Gig Pole
  2. Gigging lights
  3. Flat bottom boat
  4. Live well/storage bin
  5. GPS
  6. Safety equipment
  7. Fishing license
  8. Bug spray

1. Gigging Pole

The first gigging poles are probably thousands of years old and made out of wood. Splitting a stick at the end into three prongs and using that to catch fish is an ancient method.

Modern gigging poles however are usually made from metal and feature three prongs. Stainless steel is your best choice.

If you are on a budget you can purchase a spear fishing head and mount it onto an aluminum pole or wooden stick if necessary.

2. Gigging Light

The most productive time for gigging is on a still summers night. Locating the flounder using a light that reflects off of their eyes is crucial to your success.

You have a number of options here. Install permanent underwater lights into the hull of your boat. Mount some lights onto the guard rail as discussed below or use a hand held lamp of head lamp.

Personally I favor a mix of all of them. Permanent underwater lights are not absolutely necessary. Mounting them high up on a guard rail is perfectly fine especially if you happen to have a high powered hand held lamp or head lamp.

If you are wading then a torch can get pretty tiresome after a few hours better off investing in some flounder gigging lights for wading. Flounder gigging on foot can be super productive as it allows you to go really shallow all the time.

3. Flat Bottom Boat

Choosing the correct type of boat for gigging is very important. Given the nature of gigging and where you will be doing it a flat bottomed boat with a shallow draft is the only real option.

A standard Jon boat or any decent small flat bottomed stiff is perfectly suitable for entering the shallows.

Ideally you have an electric trolling motor as they are easy to control and will run fairly silently when compared to your normal outboard motor.

A popular modification is to install some thin aluminum or stainless steel guard rails that allow you to mount some lights on and angle them downwards. They also have the added bonus of letting you lean out across them as you are gigging.

Most boats that are used for gig fishing will tend to have fairly low sides so the added rails really can make life a lot easier.

4. Live Well or Storage Bin

You’ll need somewhere to store your catch away from flies and other insects. A lot of small fishing boats can come with a live well as part of the equipment list.

Unfortunately flounder are a flat fish and their shape can make them a little awkward to get into a standard live well.

If you use a plastic bucket with the lit cut open to just a few inches wider than your gig you can use the lip of the lid to slide the flounder from the gig as you pull the gig back out of the bucket.

Another lid can then be placed on top of this to seal it.

Also Read: Jigging for Flounder

5. Fish finder with GPS

A fish finder is not only good for reading the depth and navigation but it is also useful for two things firstly safety and then the ability to mark a good fishing spot for future reference.

Gigging at night can become disorientating especially if you are constantly focusing on the bottom right in front of you.

Before you know it you can be several miles along especially if using a trolling motor. Using a gps you can set specific alarms if you have moved more than a certain distance.

Also Read: Surf fishing for Flounder

Once you have found a good spot it is usually a good idea to mark it on your fish finder for future reference. Being able to find a spot again after being in there in the dark late at night os not always easy.

All you need to do is mark the spot and you’ll have no trouble finding it again.

6. Safety Equipment

Just because you are gigging in shallow waters does not mean you can become complacent about your personal safety out on the water.

You can drown in six inches of water if you are some how knocked out so never take a risk even in the shallows where you think you are perfectly “safe”.

A PFD(personal flotation device) for every person on board is absolutely crucial.

The boat itself should have all of the necessary onboard safety equipment that is required by the lay in your state.

Even if you have a small boat you should still have at a minimum flares, first aid kit, cellular phone and GPS.

You should also be very familiar with the tides and the area you intend on fishing in.

7. Fishing License 

Depending on where you are fishing a license is almost always a legal requirement. 

Gigging is no different.

Make sure you have an up to date fishing license for your state and that it is suitable for salt water fishing i.e it has a salt water stamp on it.

Keep it with you at all times and in a safe and dry place. I like to keep all my valuables like car keys and wallet in a water tight plastic box that floats. This is where I also keep my license.

8. Bug Spray

Bug spray is something that is commonly forgotten. Bugs love to swarm around vegetation and water and when you are gigging you will be in close to the shallows not always but quite often close to vegetation and small trees like mangroves.

I don’t know about you but mosquitoes seem to love my blood and if there are any around I always seem to be the main item on the menu.

A decent insect repellent can help to massively restrict any bites or stings that you potentially may get.

Personally I won’t go fishing without it.

Open post
Flounder GiggingBoat

Flounder Gigging Boat

Flounder boats give you the ability to cover a lot of water and pretty much float over any type of bottom no matter how muddy it may be. The best choice for a flounder gigging boat is a flat bottomed boat with a shallow draft.

Flounder Gigging Boat Setup

Take a small flat bottomed stiff or Jon boat and add a few gigging necessities and you can have your a pretty good flounder gigging boat setup.

Below we’ll list the bare minimum that you’ll need to get started.

Boat

A standard v-shaped boat will not be the best option for gigging.

The only choice here is for a flat bottomed both with a shallow draft.

How shallow a draft do you need?

Well that depends on the type of waters you will be fishing and just how deep it needs to be.

Bare in mind that the draft will be very different once fully loaded with potentially 3-4 people, several gig poles, fuel, additional lights, food and drink coolers and all of your other gear.

Having the ability to float in as little as 4 or 5 inches of water is what you should be aiming for.

The larger commercial type flounder boats will have a custom built front platform, extra guard rails, electric trolling motor, a host of electronics and some will even have an air motor mounted on a rear arch so as to reduce the amount of disturbance the boat makes in the water.

All of these things add weight.

So, if you are just looking for a small flounder gigging boat for your self and a few buddies then it’s always best to try and keep the weight down so that you can take advantage of a shallower draft.

Length wise anywhere from 16 feet and up. Just be careful that you may need to travel out into the deeper waters to access whatever bay or flats that you are looking to gig over. So be careful that your boat is sea-worthy in roughly sea’s.

Also Read: Flounder Jigging

Lights

Lights are crucial when out at night. You’ll find it is much easier t find the flounder at night when using a light compared to during the day. The refection from their eyes makes it much easier to spot them.

Flounder lights these days will almost always be LED’s. Older style 12v lights are just too hard on your battery. Especially if you are out for hours on end.

Depending on your boat there are a number of different options as to where to place you lights.

At minimum you’ll need on two on the bow one on each side. A strong handheld lamp and then I always wear a high powered adjustable LED head lamp.

The head lamp gives you great hands free control right before you go for the flounder.

Motor

Your main motor needs to be matched to the size and displacement of you boat for flounder gigging. 

A additional motor is always a good option. An electronic trolling motor with a foot control pedal can make life much easier.

You can also mount an air motor on the back so to minimize the amount of underwater noise that you create but this is more a luxury than a necessity and is only really suitable on larger skiffs.

Guard Rails

Adding on additional guard rails make is much easier to lean over and strike the flounder with your gig. The give you something to balance on and are a added safety measure.

They are also used for either lashing or mounting lights onto. The lights can be angled down and finding a good mounting bracket to fix to the rails can be far superior to any underwater mounted lights.

Electronics

Although a fish finder with a GPS is not an absolute must to have onboard it will make your life a whole lot easier.

Even a handheld GPS is still worthwhile but with the fish finder you get builtin depth sounder and access to a huge amount of maps and mapping functionalities depending on the brand and model.

With fish finders you can spend a little for a basic unit up to a few hundred dollars or splash out on a unit with all the bells and whistles which can run into the thousands.

Having the ability to accurately gauge the depth of the bottom is crucial.

Safety Equipment

Safety Equipment on your flounder boat should not be an after thought.

A lot of fishermen make the mistake of coming complacent about where they are fishing. Just because you are moving over shallow waters all the time does not mean that you cannot get into trouble.

Drowning is nothing to take likely on any type of water. You can drown in six inches of water.

Don’t take risks with your personal safety or the other people you may have on board especially if they are inexperienced at being out on the water.

Personal flotation devices(PFD’s) should be warn by all people aboard your gigging boat. Modern PFD’s are super light weight and will not get in your way no matter what you think.

A first aid kit should always be on board and should be stored in a place where it can be accessed in an emergency.

Emergency flares should also be stored in a cool airtight location.

These items are all basic seamanship and should not be ever forgotten.

A fully working radio that allows you to receive weather updates for the coast is also another crucial item.

Posts navigation

1 2 3
Scroll to top